
DIGITAL COMPASS CREATIVE STUDIOS LIMITED
HOW TO ILLUSTRATE
Illustrating is a fun process, and rightfully so. Our techniques involve using organic lines and shapes to build up our characters and environments, layer by layer. It's a systemic approach to accomplishing consistent results while having an intimate understanding of your creations. This applies both to traditional and digital illustrations.
1
Organic lines
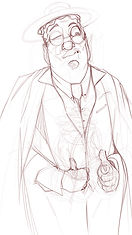
Organic lines are the results of allowing your eye-hand-pencil flow to occur naturally. Imagining the desired shape and form, then allowing your hand to move loosely to create a gesture of that form, produces a variation of lines and curves that act as a "wire frame".
2
Organic Shapes
When you've created the "wire frame" using the organic lines, you should be able to see the composite form broken up into simple recognizable shapes. This helps you to identify the structure of the character or environment and informs what kind of shading might be needed later on.
3
Organic Details
With the organic shapes in place, you can create additional detail information in areas across your designs, by simply using smaller simple shapes to mimic the detail. This can be using overlapping ovals or "curved w's" for scales and even wear and tear on materials and clothing.
4
Final Lines
When all of the organic line foundational work in set in place, your next step should be to identify the final official lines by drawing cleaner more uniformed strokes in defining the designs. Use different stroke sizes for different types of details. More prominent details may require larger strokes and finer details may require smaller lines.
5
Priming Flats
Once final lines are done and the you're satisfied with your line art, the next step is to add your "Priming Flats". Priming Flats are just the palette of colours being applied to the scene without shading or lighting. This helps with establishing depth and focus. With the colour(s) in place, you can make adjustments to the positioning and selection of colours, before adding light and shadows.
6
Shading / Shadows
Shading or Shadows are the next step. This can work as adding dimension to areas with colour, but if you're working with monochromatic colours and using the values to establish depth and focus, the shadows act like 2D Ambient Occlusion, giving you the effects of light before painting light or colours that might show with that light.
7
Lighting
Lighting is the real deciding factor in the final rendering of your illustrations. Unless the aim is to accomplish strictly line art or stylized looks, lighting tells everything else how to behave. From the light direction, to the intensity, quantity and even colour (temperature) , each aspect of lighting your illustrations will have a drastic impact on the final output. Iterations in this instance may be necessary.


INTERESTED IN LEARNING MORE?
Reach out to learn about the tutorship program and how we can customize it around your skills and schedule.